


{Bake} The Outlaw Mom’s Truffle Brownie S’More Pops
June 24, 2011 in All Posts, Bake

For Father’s Day this year, I wanted to come up with a dessert that incorporated a few of Hubby’s favorite things: chocolate, marshmallows and camping.
After rolling these elements around in my head, I decided to roll them together for my latest cake pop creation and voila! . . . the Truffle Brownie S’More Pop was born:
For variety, I also made my Choco Marshmallow Brownie Pops since - as I mentioned - Hubby loves chocolate.

 Ingredients:
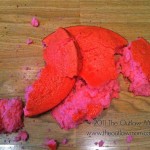
- 1/2 batch brownies (try using truffle brownies for a richly decadent pop)
- 1/2 cup buttercream frosting to start - add more if necessary (try my favorite buttercream frosting recipe)
- candy melts
- lollipop sticks (or coffee stir stix in a pinch!)
- 3 cups mini marshmallows
- 1 tablespoon butter
- graham crackers (plain or cinnamon, depending on your preference)
Step 1
Follow my cake pop tutorial here to form your cake balls and attach them to a lollipop stick, substituting the cake for brownies. Remember to use my tip here for working with the candy melts.
Step 2
While your pops are chilling in the refrigerator, melt the butter over low heat. Then stir in the marshmallows, making sure to stir frequently, until completely melted.
Step 3
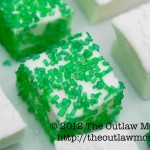
Gently hand crush your graham crackers (or place them in a plastic baggie and smash lightly with a pestle). Avoid over crushing the pieces until they turn to cracker sand. For the Choco Marshmallow Brownie Pops, shave your favorite chocolate instead. Tip: Use refrigerated chocolate and move quickly. Refrigerate the shavings before topping your pops if necessary.
Step 4
Coat your refrigerated pops with a thin layer of the melted marshmallow mixture. If your layer is too thick, the marshmallow will slide down the pop (see photo below). Once the marshmallow dries, you can attempt to either twist the marshmallow “goo” around the stick to keep it in place or pinch it off completely.

{You can see here where the marshmallow has dripped down the stick}
Step 5
Roll your marshmallow-coated pop in the crushed graham crackers (or chocolate). Re-refrigerate before displaying and serving.
For a finishing touch, I gave these cute little pops collars using the free “Tie-riffic” printables from Shindig Parties TO GO by simply punching a hole in the tops of the ties and sliding them up the sticks. The stickiness of the marshmallow keeps the collars in place.
 We also made this fun banner and incorporated smaller versions of the printed Shindig Parties TO GO ties as decorative tags for Hubby’s presents:

 {Note our favorite wrapping paper: kraft paper!}
Happy baking!
![]()
Parents and friends: for more ideas, activities, and inspiration for #RaisingThinkingKids, click on an icon below to join us on Facebook, Pinterest, Google+ and Twitter.
Fellow bloggers: join me at Bloggy Law, where you’ll find Simple Tips for Bulletproofing Your Brand and Blog and I’ll help you navigate the social media legal landscape a little more smoothly.
Chrissy – who has written 426 posts on The Outlaw Mom® Blog - Creative Living in a Conventional World.


[…] Truffle Brownie S’mores Pops from The Outlaw Mom […]
[…] here for how we packaged them and to see the Truffle Brownie S’More Pops we made for Hubby on […]
OMGosh!! Yum, yum, yum!! Thank you so much for linking up at kissedbyafrog.blogspot.com! I really appreciate it! I hope you will come back again this week!
Jenni
kissedbyafrog.blogspot.com
Yes, totally yummy! Thanks for hosting the party and I’ll be back
Goodness! You really do go all out, don’t you? I love the tiny ties on the packages!
There’s a surprise awaiting you on my blog tonight
Well, some things are worth celebrating, right?!
Yipee! I’m honored to be part of the best in show flock
How awesome! I really like this. I might have to try it for my hubs next time I go shopping. Thanks for linking it up to the Throwback Thursday link party.
Linky open through Sunday.
http://www.luxeboulevard.blogspot.com
I’m sure he’ll love it! Thanks for stopping by (Btw, love that pink feathered headband you made this week!)
Those look ridiculous- I thought we were creative by writing poems. Awesome!
Different kind of creativity Looking forward to more activities for us to do to keep us “un-bored” at your blog!
haha! We live in Laredo- so I’ve gotta get creative! I’m loving finding these mom-blogs-
Wow these are amazing! Very impressive - I also love the banner idea with the ties!
Thanks - they were very very yummy! We’ll be checking out some projects at your site to do this summer. Thanks for stopping by