


{Bake} Milk Caramels #SmartFinalSupportsSoCalSchools #CBias
December 21, 2011 in All Posts, Bake, Sponsored Posts

It’s safe to say I’m a bit caramel obsessed. Who can resist the ooey, gooey goodness of a warm Caramel Sauce drizzled over an inside-out Apple Crumble Cheesecake or thick, creamy Caramel Frosting Brownie Sandwiches? This holiday season I’m making lots of caramel-drizzled desserts, but I’m also making caramels. Salty ones like these delicious, divine ones and easy “healthy” milky ones like these:
Of course they’re good for you! They’re made with 3 cups of milk - and everyone knows milk does a body good!
What’s even better about these Milk Caramels is that the products I purchased to make them are doing California schools good, too. I bought the main dairy ingredients at Smart & Final, where their First Street products help our students get books and school supplies. Every time your purchase a First Street product, remember to collect the Real California milk seal and give it to your child’s teacher, who can submit them as an entry into the California Milk Advisory Board “Help Our Teachers, Help Our Kids” sweepstakes promotion. Teachers who submit 100 seals get 25 Scholastic books or a $25 school supply gift card, plus each teacher entrant gets one Scholastic book!
Here’s a list of all the fresh, yummy dairy you can use to fill your family and friends’ tummies and help California schools at the same time:
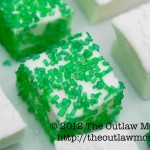
“Healthy” Milk Caramels
Adapted from Food.com contributor Ocean~Ivy’s recipe
Ingredients
- 3 cups milk
- 2 cups sugar
- 1 cup light corn syrup
- 1/4 cup butter
- 1 tsp vanilla
- 1/2 tsp salt
Step 1
Dissolve sugar and corn syrup in 1 cup of milk and cook until mixture forms a firm ball when dropped into cold water.
Step 2
Add another cup of milk to the cooking mixture and cook until mixture forms a firm ball when dropped into cold water.
Step 3
Add the last cup of milk, the salt and the butter to the mixture and cook until mixture forms a firm ball when dropped into cold water.
Step 4
Remove from heat, carefully stir in the vanilla, and immediately pour into a buttered pan.
Let chill, then slice and enjoy!
Happy Baking!
Disclaimer: This project has been compensated as part of a social shopper insights study for #collectivebias #CBias #
![]()
Parents and friends: for more ideas, activities, and inspiration for #RaisingThinkingKids, click on an icon below to join us on Facebook, Pinterest, Google+ and Twitter.
Fellow bloggers: join me at Bloggy Law, where you’ll find Simple Tips for Bulletproofing Your Brand and Blog and I’ll help you navigate the social media legal landscape a little more smoothly.
Chrissy – who has written 422 posts on The Outlaw Mom® Blog - Creative Living in a Conventional World.


Oh my gosh. Those look way too good! Love this as a gift idea - how wonderful to give something so yummy!
Yum! I love caramels, will have to try this out.